
Threat Hunting With Microsoft Sentinel
- CyberSpeak Labs

- Mar 16, 2025
- 9 min read

Hey everyone! Today I’ll be showing you on how you can use Microsoft Sentinel to perform threat hunting. This blog is going to be a bit lengthy since I want to document each and every step I take. I’m in no way an expert in threat hunting or any topics related to cyber but I try my best to learn everyday. Feel free to point out any issues you find in my blog! Enjoy! :)
Content Section
Introduction
What is Threat Hunting?
Why Use Microsoft Sentinel?
What You’ll Learn from This Blog
2. Setting Up the Environment
Creating a Virtual Machine (VM) in Azure
Configuring the VM for Remote Desktop Protocol (RDP)
Testing Connectivity to the Azure VM
3. Configuring Microsoft Sentinel
Setting Up a Log Analytics Workspace
Creating and Connecting a Microsoft Sentinel Instance
Linking the VM, Sentinel, and Log Workspace
4. Log Ingestion and Verification
Simulating Failed Login Attempts
Checking and Querying Logs in Azure
Ensuring Logs Are Ingested from the VM
5. Threat Hunting in Microsoft Sentinel
Performing IP Lookups for Suspicious Activity
Querying for Failed Login Attempts (Event ID 4625)
Identifying Unauthorized Access Attempts
6. Creating Custom Alert Rules
Setting Up Alerts for Failed Login Attempts
Monitoring and Responding to Real-Time Alerts
7. Advanced Threat Hunting Queries
Querying Failed Logins with Kusto Query Language (KQL)
Analyzing Logs for Repeated Attacks and Malicious IPs
8. Conclusion
Key Takeaways
Next Steps in Your Threat Hunting Journey
What to Expect from This Blog
In this hands-on blog, we’ll dive deep into the fascinating world of Cyber Threat Hunting using Microsoft Azure and Sentinel. Whether you’re a beginner eager to explore threat detection or an experienced analyst looking to sharpen your skills, this guide provides a step-by-step walkthrough of setting up a vulnerable virtual machine, configuring log ingestion, and performing real-time threat-hunting queries.
Here’s what you’ll gain from this blog:
✅ Practical Experience: You’ll set up a Virtual Machine (VM) on Azure, configure Remote Desktop Protocol (RDP), and intentionally simulate suspicious activity.
✅ Threat Detection Techniques: Learn how to monitor failed logins, analyze security events, and create custom alert rules using Kusto Query Language (KQL) in Microsoft Sentinel.
✅ Real-World Scenarios: You’ll simulate and investigate fake login attempts, perform IP lookups, and connect the dots to identify potential attacks.
✅ Building Critical Skills: From setting up an Azure environment to creating advanced custom alerts, this guide will help you develop essential skills for incident response and threat detection.
By the end of this tutorial, you’ll have a working knowledge of how to set up an effective threat-hunting environment and apply these methods in real-world cybersecurity investigations. Let’s get started!
Setting up Our Virtual Machine
I started by signing up for the Azure free trial. You will get $200 credits and its more than enough.
Creating Virtual Machines: Go to the Azure portal at portal.azure.com and search for “Virtual Machine.” You’ll be presented with the screen shown below.
2. Click on create.


3. Click on Next: Disks, then proceed by selecting Next: Networking.
4. Click on Advanced, followed by Create new as shown below. In this step, we will set up a firewall that allows unrestricted access to the internet.

5. In the next pane, delete the pre-assigned rule and create a new one. Keep in mind that we’ll use the most vulnerable settings to ensure malicious activity is captured in our VM Logs.
6. Configure the new rule with the settings below. Set the destination port range to an asterisk (*) to allow all ports, and adjust the priority to 100. Finally, click on Review and proceed to Create your VM

Remote Desktop Setup
Next, we will remotely connect to the VM using Windows Desktop Protocol (RDP).
Navigate to Resources, click on the VM, and copy the public IP address of your VM.

2. On your Windows machine, search for Remote Desktop and open the RDP app. Enter the IP address and the username you used when creating the VM.


3. Once logged in, we need to disable certain Windows firewall settings to intentionally make our VM vulnerable.
4. On your remotely accessed VM, type Windows Defender Firewall with Advanced Security and press Enter.

5. Locate Windows Defender Firewall Settings, and a new pane will appear. Click on each tab and set the firewall state to Off.

TESTING CONNECTIVTY TO OUR AZURE VM
1. Next, we will run a simple ping command from our Windows host machine to the Azure VM to ensure connectivity, allowing both us and potential attackers to reach the VM.
2. Open PowerShell on your Windows host machine and use the command ping <ipaddress>, replacing <ipaddress> with the public IP address of your VM.

3. As shown above we get a reply hence our connectivity is working.
Checking if our Azure VM is able to ingest logs
1. Log out of the remote desktop and intentionally enter incorrect credentials.
2. Next, open your VM and launch Event Viewer. Navigate to Security Logs to check if the VM is successfully ingesting the logs.
3. I filtered the logs using the name Akash, as that was the incorrect username I entered.

4. When I open the log filtered in step 3, I can see the username Akash and the indication that a bad or incorrect password was entered.

Making our LOG Analytics Workspace
Purpose of this is to ingest logs from our VM.
In the Azure portal, search for Log Analytics and click on the corresponding result.

2. Click on Create, enter the required details as per the instructions, and then click Review and Create.

Creating our Sentinel SIEM Instance
In the Azure portal, search for Sentinel and press Enter. Click on Create Microsoft Sentinel.

2. Select the Workspace that you created earlier and click Add.

Connecting VM, Sentinel, and Our Workspace together
The importance of this step is to make sure; we can see our logs from our VM in our log space.
1. In the Azure portal, search for Sentinel, then go to Content Management and Content Hub. In the search bar, type Security Event.
2. Look for Windows Security Event and click install on the right pane

3. Click on Content Hub again, search for Windows Security Events, and then click Manage from the right pane.

4. Look for Windows Security Events via AMA, select it, and click Open Connector from the right pane.

5. Create data collection rule:

6. Click next and now expand and select our VM.

7. On the next page, select All Security Events and click Next, then hit Create.
Checking if our logs are being ingested in our Azure Environment
Go to portal.azure.com, search for Log Workspaces, and select it. Then choose your log workspace.

2. Click on Logs, and switch from Simple mode to KQL mode (Kusto Query Language).

3. Now, in KQL mode, type SecurityEvent to query and view your Windows logs. This will display the security-related events that have been ingested into your Azure Log Analytics Workspace.

Intentionally using fake usernames to login
1. To verify that Azure is able to ingest incorrect login credentials, I entered ThisIsFAKE as the username while attempting to log into my Remote Desktop connection.Went over to the logs on my azure portal and checked the logs.
2. After the login attempt, I navigated to the logs section in my Azure portal to check if the event was recorded and ingested correctly.

3. The logs have many columns, but to focus on the relevant information, we can use a KQL (Kusto Query Language) command to filter and display only the columns of interest.
4. I used the following command to query for logs where the account is AzureAD\ThisIsFAKE, which was the intentionally incorrect username I entered:
5. SecurityEvent | where Account == “AzureAD\\ThisIsFAKE” | project TimeGenerated, Account, EventID, IpAddress
6. To gather more information about the IP address, we can use the IP address from the logs and perform an IP lookup. Simply go to https://whatismyipaddress.com/ip-lookup, enter the IP address from the logs, and the website will show the geographical location associated with it.Since I’m in Missouri, the IP lookup should show that the IP is located in Missouri. This is helpful to verify the IP address’s origin and further analyze any suspicious activity.

Checking for failed logon attempts
1. To check how many failed logon attempts occurred, I used KQL and focused on Event ID 4625, which tracks failed logon attempts. This allowed me to narrow down and analyze the events related to unsuccessful login attempts.
2. Upon reviewing the logs, I noticed multiple failed login attempts from a specific IP address. The attacker was attempting to log in using the username “Administrator.” I then proceeded to look up the IP address, and to my surprise, it was traced back to a Brazilian state. This raised a red flag, as it indicates a potential attack from an external source attempting to gain unauthorized access to the system.

Creating our custom alert rule
I will be setting up a custom alert in Azure Monitor to detect failed logon attempts by monitoring Event ID 4625.Go to portal.azure.com and look for Azure monitor

Click on the create dropdown and choose alert

2. Click on custom log search
3. There are additional settings, such as the alert name and threshold, which can be customized according to your preferences. I named mine “Failed Login Attempt.”

4. After performing some intentional logon attempts on my remote desktop, I saw the alert trigger and appear in Azure Monitor.
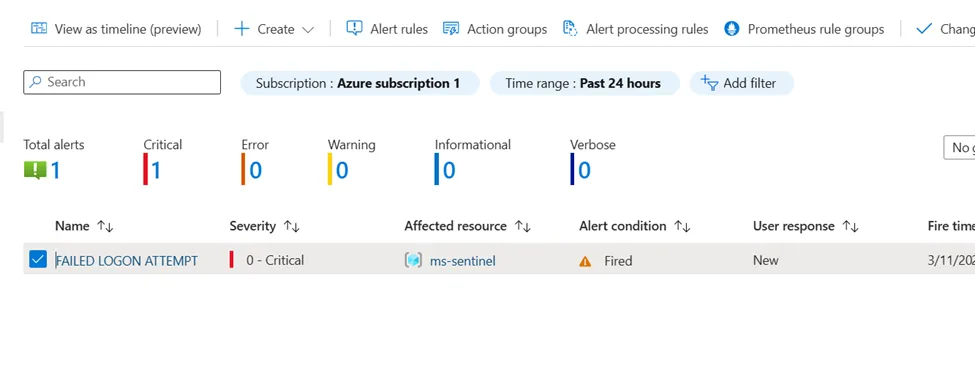
5. After letting my VM run for one day, allowing random attackers to attempt unauthorized access, I checked the alerts again. This time, there were significantly more alerts indicating failed login attempts.

Hands-On Task: Performing Threat Hunting Queries
1st Scenario: Query to Detect Failed Login Attempts
Query:
SecurityEvent| where EventID == 4625| where AccountType == “User”| project TimeGenerated, Account, EventID, Activity, IpAddress, IpPort, TargetAccount| order by TimeGenerated descExplanation:
1. SecurityEvent:o This is the dataset being queried. It typically stores Windows security logs, such as logon attempts, account activity, and other security-related events.
2. | where EventID == 4625:o The where filter is used to focus on a specific event. Event ID 4625 represents a failed logon attempt in Windows Event Logs. This event is crucial for identifying unauthorized or unsuccessful logins to the system.
3. | where AccountType == “User”:o This filter narrows down the results to only show logs where the AccountType is “User”. This exclusion ensures that logs related to machine accounts, service accounts, or system accounts are not included in the analysis. The filter focuses on actual user login attempts.
4. | project TimeGenerated, Account, EventID, Activity, IpAddress, IpPort, TargetAccount:The project operator selects specific columns to display:
§ TimeGenerated: Timestamp of the event when it occurred.
§ Account: The account initiating the logon attempt (the user trying to log in).
§ EventID: The Windows event ID (in this case, always 4625 for failed logons).
§ Activity: Describes the action taken (for example, “Logon Failure”).
§ IpAddress: The IP address from which the logon attempt originated.
§ IpPort: The source port of the connection (useful for identifying remote logins).
§ TargetAccount: The account that was the target of the login attempt.
5. | order by TimeGenerated desc:The order by clause sorts the results by TimeGenerated in descending order. This means the most recent failed logon attempts will appear first in the query results, allowing for immediate detection of recent suspicious activity.
✅ Summary:
This query retrieves failed user logon attempts from the SecurityEvent table, including relevant information like:
When the failure occurred (TimeGenerated)
Who attempted the login (Account)
Where it came from (IpAddress, IpPort)
Which account was targeted (TargetAccount)
The results are shown in reverse-chronological order.
Result-

Using the Query in a Real-World Incident Response Scenario
The KQL query:
SecurityEvent| where Account == “AzureAD\\ThisIsFAKE”| project TimeGenerated, Account, EventID, IpAddressThis query can be crucial during an incident response investigation by:
1. Identifying Unauthorized Access Attempts: It detects specific failed login attempts by filtering logs for suspicious usernames (e.g., “ThisIsFAKE”).
2. Tracking Malicious IPs: The query captures the IP address of the source, enabling further investigation through IP lookup services to identify geographical origins or potential threat actors.
3. Monitoring Brute-Force Attacks: By focusing on Event ID 4625 (failed logins), analysts can identify patterns of repeated access attempts, which may indicate a brute-force attack.
4. Creating Alerts for Quick Detection: You can automate the query via Azure Monitor to trigger alerts, ensuring rapid response to potential intrusions.
In practice, this approach helps security teams proactively detect, investigate, and mitigate unauthorized access before it leads to a full-scale breach.
Summary: Bringing It All Together
In this blog, we explored how to leverage Microsoft Sentinel for effective cyber threat hunting. From setting up a vulnerable virtual machine on Azure to configuring log ingestion and crafting advanced KQL queries, we’ve covered the essential steps to monitor and detect suspicious activity.
By intentionally simulating failed login attempts, analyzing security events, and creating custom alert rules, you’ve gained hands-on experience that mirrors real-world scenarios. These skills are crucial for identifying and mitigating potential threats in modern IT environments.
Whether you’re just starting your cybersecurity journey or refining your threat detection capabilities, this guide provides a solid foundation for using Microsoft Sentinel in proactive threat hunting. Keep exploring, stay curious, and continue to sharpen your skills — because in cybersecurity, vigilance is key!
Happy hunting! 🚀
Author: Hammaz Ahmed


Comments